
Select a Client-Site
During the onboarding process, your organization may choose to enable the Client and Site fields as part of the dispense parameters. When active, these fields allow users to assign a specific client and site to each fuel transaction while setting up a new dispense.
If the Client/Site Parameters are Enabled
-
Users can filter and report on all dispense activity based on client and/or site.
-
This enhances visibility into fuel usage, making it easier to track consumption, generate reports, and monitor project-related costs.
-
It supports operational accuracy and accountability by associating fuel usage with specific clients or locations.
If the Client/Site Parameters are Disabled:
-
These fields will not be available during the dispense process.
-
This does not impact the dispensing operation, but data will not be grouped or reportable by client/site.
An example of the client/site dispense parameter on the dispense setup page is shown below:
How to Select a Client and Site Parameters
-
Open the Fuellox mobile app and proceed to the Dispense screen, where you begin configuring your fuel dispense.
-
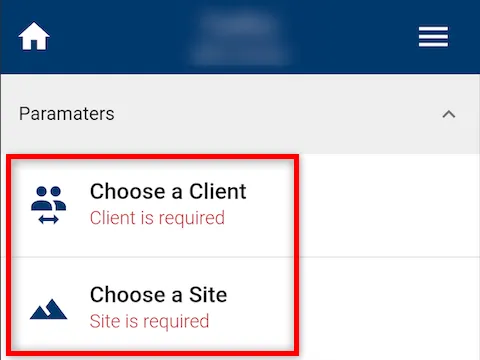
If the client/site parameters are enabled for your organization, you will see the following fields under the Parameters section:
-
Choose a Client
-
Choose a Site
-
-
Tap on Choose a Client or Choose a Site to view a list of available options assigned to your organization.
-
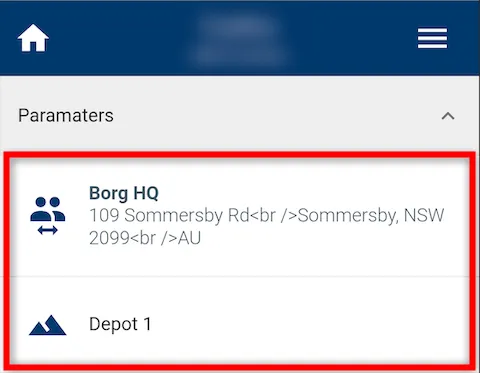
A list of options will appear. Select the appropriate client and site to associate with your dispensing session.
-
Once selected, the chosen client and site will appear in the respective parameter fields, confirming your selection before continuing.
So this is how you can easily select the appropriate client and site during the dispense setup process in the Fuellox Mobile App.
Return to Getting Started