
System Configuration
Once the Fuellox hardware is installed, it must be configured through the Fuellox App. This section walks you through configuration options, managing the devices, and how to applying the configuration device settings to the hardware.
Configuration Options
Timers
| Feature | Description | Default Value | unit |
|---|---|---|---|
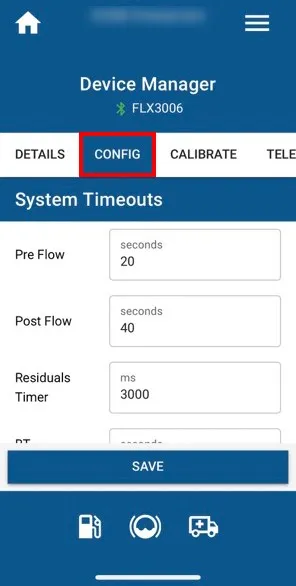
| Pre Flow Timeout | Time to start flow once pump starts | 20 | sec |
| Post Flow Timeout | Time to restart flow once pump stops | 40 | sec |
| Residuals Timer | Time to detect flow after transaction ends | 3000 | milli sec |
| BT Reconnect Timer | Time to reconnect BT if connection is broken | 3000 | milli sec |
| Max Pump Run Timer | MAx time for pump active. Creates a pump On/Off duty cycle | 0 [Disabled]; 10 = 10 on 10 off | Min |
IO Options
| Feature | Description | Default Value | unit |
|---|---|---|---|
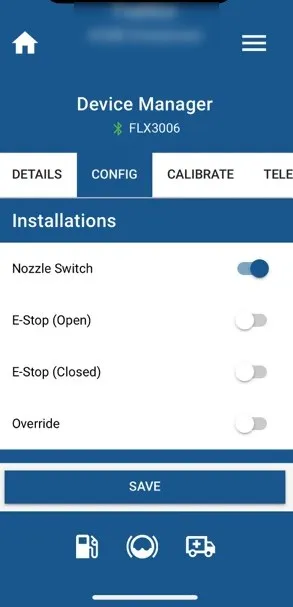
| Nozzle Switch | Enable Nozzle switch input | False | Boolean |
| E-Stop (Open) | Normally Open Emergency Stop (Estop_) installed | False | Boolean |
| E-Stop (Close) | Normally Closed Emergency Stop installed | False | Boolean |
| Override | Not Applicable - Future feature | False | Boolean |
Level Options
| Feature | Description | Default Value | unit |
|---|---|---|---|
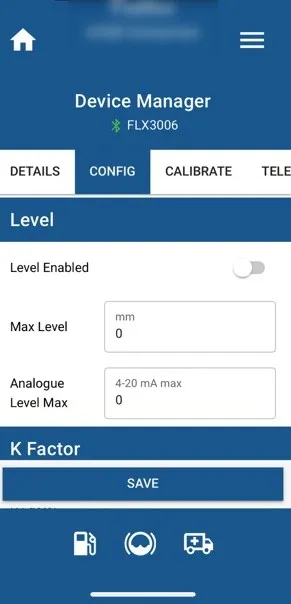
| Level Installed | Enables level sensor | False | Boolean |
| Max Level | Max tank height (usually Safe Fill) | 3000 | mm max |
| Max Analogue | Max analog value (20mA typically) | 20 | mA max |
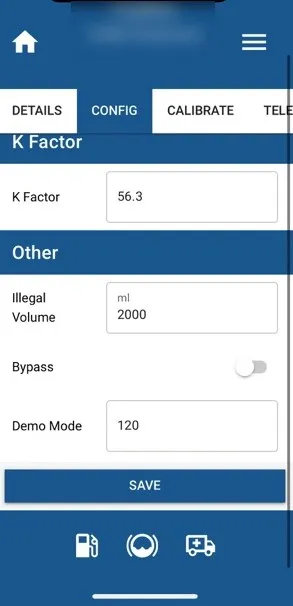
K-Factor
| Feature | Description | Default Value | unit |
|---|---|---|---|
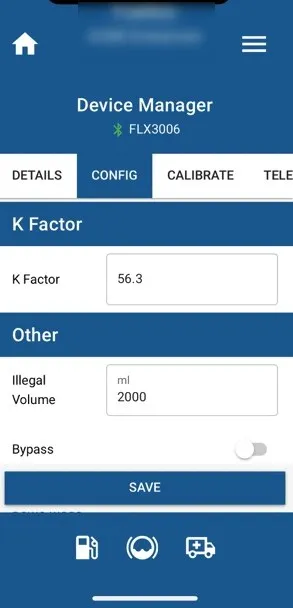
| Pulse Meter K-Factor | Pulses per litre for the Pulse Meter Model ; Check your meter instructions. | K-24 = 33, OM-025 = 106.841 | pulses/L |
Other
| Feature | Description | Default Value | unit |
|---|---|---|---|
| Illegal Vol | Volume to detect & log from non authorised pulses; acts as a noise filter if needed | 2000 | mL |
| Bypass | Reserved for future functionality | False | Boolean |
| Demo Mode | Virtual pulse input. Simulates a pump running. Used for testing and demos | 0 = Off 100 = on | pulse per second |
Managing the Devices
Not every user has access to manage or configure a Fuellox device. Access to these settings is typically reserved for:
- Installers
- Resellers
- Certified service agents
From time to time, customers may need to make configuration changes—such as modifying a timer, enabling a nozzle switch, or adding an E-Stop input.
-
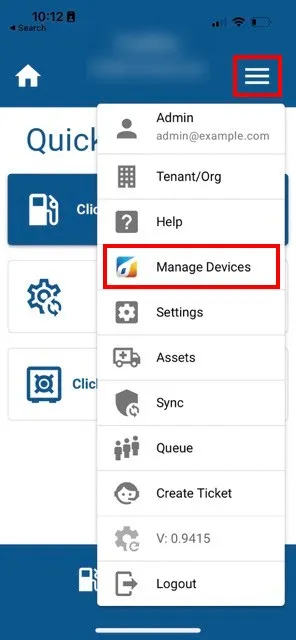
Open the Fuellox App. Tap the Menu (☰) icon in the top-right corner. Select Manage Devices.
-
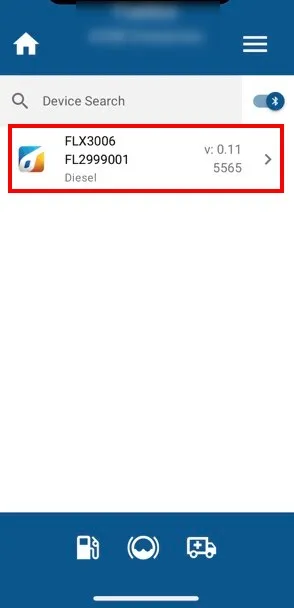
It will open the Manage Devices page. Toggle the Bluetooth switch to discover nearby devices.
Tap your device to connect and open the Config page. The app will need to establish a connection with the actual device.
-
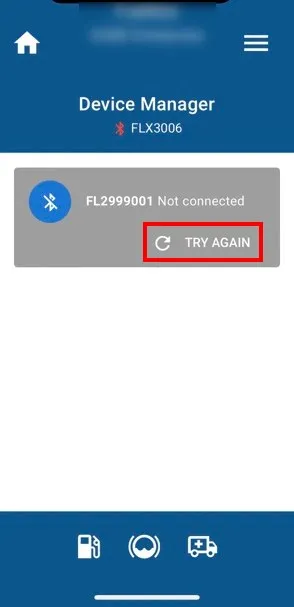
If the connection fails, tap TRY AGAIN button to try again.
-
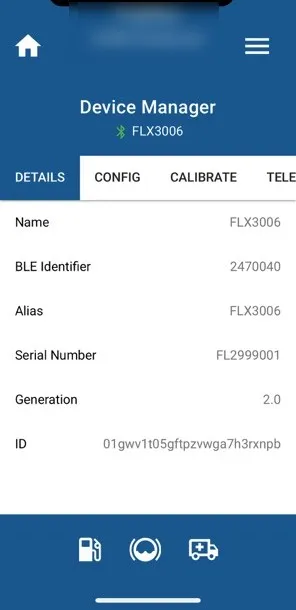
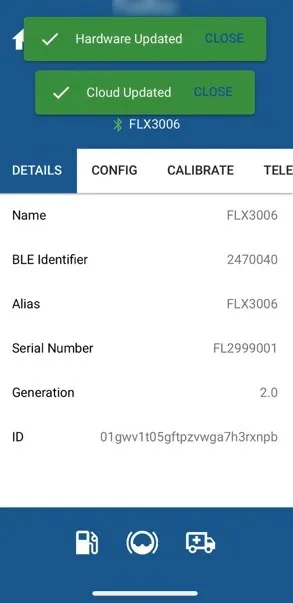
Once connected, the unit’s details will be displayed.
Configuring Device Setting Options
-
Click the CONFIG Tab to access the configuration options.
Enter the system timeout values or accept the default settings. Then scroll down to continue.
-
Apply the Installation (I/O) Toggles.
Set the nozzle switch and E-Stops according to the systems that are installed and properly wired.
-
Apply Level Attributes.
Enable the Level switch, and ensure you’re using an approved level instrument (e.g., IOTIQ FLX-LVL-JPS3).
If you’re unsure about any of the other settings, contact the Help Desk—they can provide recommendations to help get the system operational.
-
Enter the K-Factor if it has not already been applied to the device.
If you’re using the default value provided in your pulse meter’s instructions, you will still need to perform a proper calibration to ensure accuracy.
Some meters, such as Flomec OM-025 variants and Macnaught MX series, come with a calibration certificate. These high-end meters often provide better value, as they can eliminate the need for a separate calibration service—making them more cost-effective than calibrating low-cost meters manually.
-
Enter the Optional (Other) Settings In most cases, these settings do not need to be changed. The default values are suitable for 99% of use cases.
-
Demo Mode is useful when configuring a system before wiring is complete.
To enable it:
-
Enter a value into the Demo Mode field (e.g., pulses per second).
-
This will simulate a virtual pulse meter.
When the pump starts and the nozzle is lifted, virtual pulses will begin, simulating a fuel dispense. The data is sent to the Fuellox Cloud just like a real transaction.
-
-
Click SAVE button to apply the updated configuration to both the device and the Fuellox Cloud. After saving the configuration the screen will switch to the DETAILS tab.
-
After applying the changes, the device must be powered off and restarted. A power cycle is essential to activate the new configuration.
Failure to reset the device may result in it continuing to operate with the previous settings.
Calibration
For instructions on how to begin the calibration process, refer to the Calibration guide.